
Preparing Character Artwork Before Rigging
Before Live2D, Spine, or After Effects
Understand how to prepare flattened character artwork before rigging, including the layer regions, hidden areas, and cleanup work needed before moving into a dedicated 2D rigging workflow. Understand the separation and cleanup work that needs to happen before you build a Live2D, Spine, or After Effects rig.
Rigging starts before you add the first bone. If your character exists only as one flattened image, first separate it into workable regions and review the hidden areas.
Open 2D Character Rigging PrepWhy use AI for rigging layer preparation?
- Separate hair, eyes, eyebrows, mouth, and body into individual rig-ready layers.
- AI inpainting completes hidden regions behind overlapping parts — no manual repainting.
- Export layered PSD for Live2D Cubism, After Effects, or PNG layers for Spine.
- Consistent body-part separation across your entire character library.
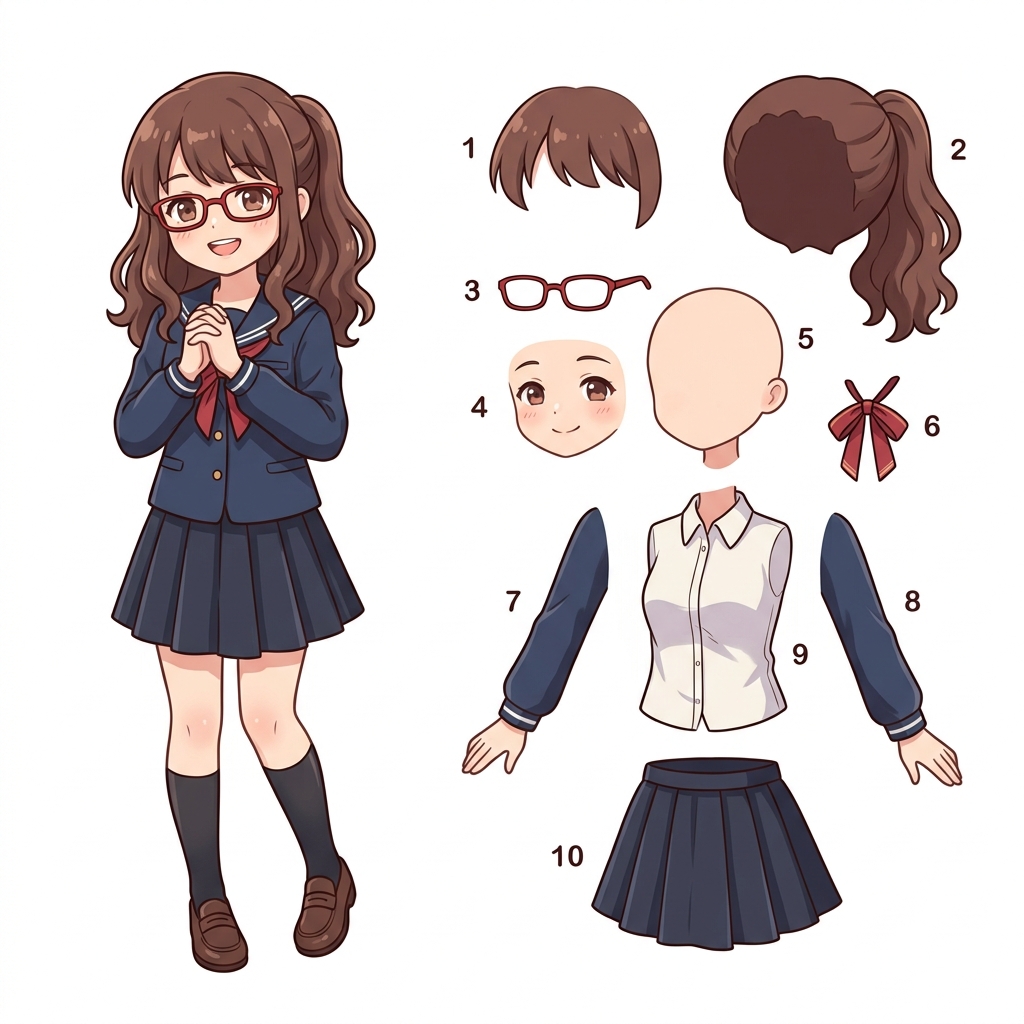
How to Prepare Rig-Ready Layers for Animation (4 Steps)
Upload your character illustration
Set layer depth for rigging needs
Preview separated layers with background completion
Export PSD or ZIP for your animation tool
Case Studies: Rig-Ready Layer Preparation
VTuber creator: Live2D rigging prep
Problem: Manual layer cutting for a VTuber model with detailed hair strands and accessories takes 4–6 hours before rigging can even begin.
Solution: Upload the finished illustration to get rig-ready PSD layers with front hair, back hair, eyes, eyebrows, and mouth separated — each with completed backgrounds behind overlapping parts.
Benefit: Rigging prep reduced from hours to minutes. The artist starts binding in Live2D Cubism the same day.
Indie game studio: Spine animation assets
Problem: Building a library of layered character assets for Spine skeletal animation requires consistent layer separation across dozens of characters.
Solution: Batch-process character art through AI layer separation to get consistent body-part layers ready for Spine mesh binding and skinning.
Benefit: Standardized layer outputs across the team, faster prototyping for character animation.
Motion designer: After Effects character animation
Problem: Flat character illustrations need manual masking before puppet-pin or DUIK rigging in After Effects.
Solution: Export rig-ready PSD with separated limbs, head, and accessories. Import directly into After Effects as a layered composition.
Benefit: Skip the masking step entirely — go straight from illustration to animation.
Anime fan artist: expression sheet preparation
Problem: Creating expression variations requires isolating facial features from a finished illustration without damaging the original.
Solution: AI separates eyes, eyebrows, mouth, and hair into independent layers with clean alpha channels, preserving the original composition.
Benefit: Swap expressions non-destructively. One illustration becomes an entire expression set.
Animation team: consistent rigging standards
Problem: Different artists can produce inconsistent layer separations, causing rework during the rigging phase.
Solution: Standardize the first pass of layer separation with AI, then let riggers refine only what needs adjustment.
Benefit: Consistent layer naming and separation depth across the entire production pipeline.
Continue to the Character Preparation Workflow
Once you understand the preparation work, move into the dedicated workflow to separate and review your character artwork before rigging.
Preparing Character Artwork Before Rigging FAQ
How does this differ from the 2D Character Rigging Prep workflow?
This is an educational workflow guide about the preparation problem. For the actual preparation flow, use 2D Character Rigging Prep from the Character to Layers hub.
What layer granularity works for Live2D rigging?
For Live2D Cubism, you typically need front hair, back hair, left eye, right eye, eyebrows, mouth, head outline, torso, and accessories as separate layers. Set the layer depth to 8–12 to achieve this level of separation.
Does it handle occluded body parts behind hair or clothing?
Yes. AI inpainting fills in hidden regions behind overlapping layers — for example, completing the forehead behind bangs or the neck behind a collar — so each layer is ready for independent movement during rigging.
Can I use the PSD output directly in Spine?
Spine imports PNG images, not PSD layers directly. Export the ZIP format which gives you individual PNG layers with a manifest. You can also open the PSD in Photoshop and export slices for Spine.
Is it suitable for anime-style character art?
Yes. Anime-style illustrations with clean outlines and distinct color regions produce some of the best results for AI layer separation, especially for VTuber model preparation.
How accurate is the body-part separation?
AI detects standard body regions (head, torso, limbs, hair) and accessories. Complex overlapping accessories may need manual cleanup after export; review the layer boundaries and naming before rigging.
Can I prepare character layers for After Effects puppet rigging?
Yes. Export as PSD and import into After Effects as a layered composition. Each separated body part becomes an independent layer ready for puppet pins, DUIK, or Rubberhose rigging.
What character art styles work best for rigging preparation?
Full-body character illustrations, VTuber reference sheets, and game character concept art with clear silhouettes produce the most usable rig-ready layers. Heavily stylized or abstract art may need more manual refinement.
Does this tool replace manual rigging?
No. This handles the layer preparation step — separating a flat image into independent parts. You still need to rig those layers in your animation tool (Live2D, Spine, After Effects). It eliminates the tedious cutting and masking step.
How does background completion work for rigging?
When layers overlap (e.g., hair covering the forehead), AI generates the hidden portion so that when the layer moves during animation, there are no gaps or missing pixels. This is critical for smooth Live2D and Spine animations.